Every year when I fist step foot into my classroom.....I have the same recurring thought, "How am I going to hide all my junk this year?"
You see (like many of us) in my 9 years of teaching I have accumulated piles of stuff, boxes of things and loads of junk.
Do I throw this stuff away?
Well.... OF COURSE NOT....I mean, "you never know when I am going to need it again!"
Which brings me to the question I always ask myself.....how can I keep it, but not see it?!?!?
So, this year I made some inexpensive no-sew curtains!!! They are super cute, and super great at hiding your precious treasures. (wink, wink)
Here is the before, and a glimpse at why I needed to do something!
And here is the after! Goodbye junk and see ya later ugly desk cords.
Much better, right?
Are you interested in making these cuties yourself? Just follow the steps below!
Step 1: Measure the area you want to cover up.
- I always add a few inches in length and width. It is much easier to cut off extra, than to start from scratch because it was too short.
Step 2: Purchase your fabric and ribbon.
- Prior to purchasing fabric I did a quick inventory of what I had at home and then created a color scheme based around existing items. At home, I already had some black fabric scraps and yellow....so I made my theme yellow, purple and black. Then I went to JoAnn's Fabrics (teachers can get a 10% discount there without a coupon) and hit up their clearance fabric section. I purchased about 10 yards and only spent about 30 bucks. I looked for fabric that had all different patterns and textures---as long as it was in my color scheme
Step 3: Set up work station
Step 4: Cut ribbon
Step 7: Tie your fabric strips to the ribbon
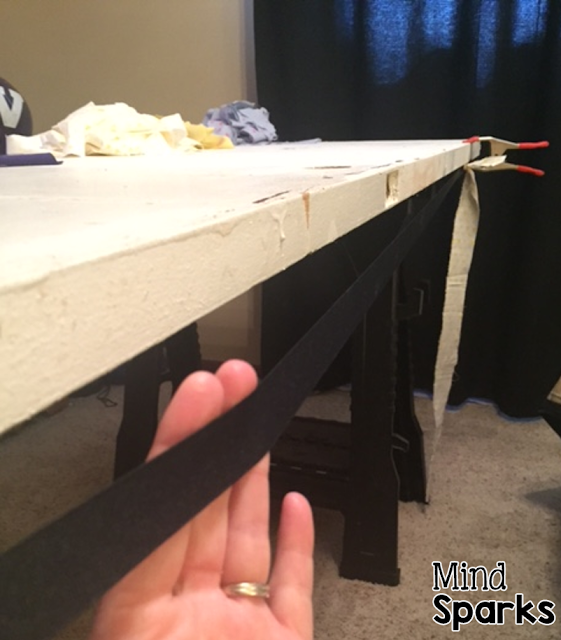
- You will want to set up some sort of work station that allows you to full stretch out the ribbon, as you will be tying the fabric onto the ribbon. My husband used two saw horses and an old door. We then clamped down the ribbon on each end of the door, with a little slack so I would be able to pull out the ribbon and tie. You could also tie the ribbon to two chairs, a bar stool or hooks.....just as long as it is fully extended.
 |
| Two saw horses, an old door and clamps helped me secure my ribbon. |
 |
| This is about how much slack you want in the ribbon, so you can easily tie fabric. |
Step 4: Cut ribbon
- Cut the ribbon a couple of inches longer than the desired area you are covering. It is always easier to cut off extra than to start from scratch because you don't have enough width.
Step 5: Cut fabric into strips
- Just like with the ribbon, you will want to cut your fabric longer than the desired length. Not only do you not want it to be too short, but you also need to account for the fact some of the length will be used for the knot you are tying. I would say an extra 5-6 inches, and you will be good to go!
- I wanted my no-sew curtains to be in a pattern, so I laid my fabric into sorted piles. You could skip this step if you don't want to follow a pattern.....just stick the fabric strips into a big pile. :)
- Make a loop with the top 5-6 inches of fabric
- Place the fabric loop behind the ribbon
- Hold the fabric loop with one hand (ribbon is on top of fabric loop)
- bring the remaining hanging fabric over the ribbon and through the loop
- Select another piece of fabric and keep tying until ribbon is full!
Step 8: Remove the no-sew curtains from work surface
- Once I was finished, I un-clamped my work and hung the no-sew curtains over a hanger. I didn't want them getting tangled as I transported them to school.
Step 9: Hang Curtains
- There are many ways to hang these curtains. You can Velcro, double sided tape, hot glue or even use 3M hooks. I personally used Velcro....and lots of it....these babies are pretty heavy with all of that fabric. I placed one sticky side of the Velcro to my desk/table, and then they other side of the Velcro on one of the pieces of fabric....and voila!
All in all...I am pretty thrilled with how this project turned out! It was cheap, took a couple hours and made my classroom instantly cute and homey! If you have any questions--feel free to contact me!
Happy Crafting! :)


