Home Meet the Blogger Freebies Contact TeachersPayTeachers BlogLovin Instagram Pinterest Facebook Twitter Image Map

December 20, 2016

Show and Tell Tuesday

Today I am linking up with Forever in Fifth Grade for her linky party: Show and Tell Tuesday!

The goal of the linky party is to showcase up to four fun things you have going on in your classroom or personal life, and then tell all of your readers about them!

On Monday we had "Hot Cocoa Bar" in my classroom as our holiday party.  The kids drank some delicious crockpot cocoa and were able to to top it with goodies of their choice! :) While they were sipping their tasty treat, we played Christmas music and colored some Christmas pictures!  We sure had a fun time! :)


If you want the recipe for the Crockpot Cocoa, click the pin below!


 I can't take credit for the art showcased in the pictures above, but I can say I work at a school with some amazing educators!  I mean....how cute, creative and festive is all of the artwork that is currently on display at my school?!?!


Last but not least.....allow me to showcase my adorable pooch and her equally cute cousin!  OR....better yet "Santa Paws and her reindeer!"  Pictured above is Rudy (my chocolate lab and school's therapy dog) and Zoey (a dachshund with more personality than you can even imagine.)

Have a great week everyone! :)


December 16, 2016

Flashback Friday---Cute Holiday Gifts!

Happy Friday everyone!

Today its is all about a #flashbackfriday to some pretty cute Christmas gifts I gave my students.

These reindeer suckers are cheap, festive and easy to make!


If you want the full set of directions on how to make these little babes, click here to take you to my original post.

Now for those of you that are lucky enough to call this your last day.....have a super fun and RELAXING break.

For those of you that still have a few days left with your kiddos......  YOU CAN DO IT!


November 27, 2016

Giveaway and a TPT sale!!!

I have two REALLY EXCITING things to share......

FIRST.....enter below for a chance to win a $10 TPT gift card!  Whoop Whoop!!!

You only have one week to enter, and you can't win if you don't try!  So....get your entries in before December 5th!!  I mean....who wouldn't want to win 10 dollars to TPT???
a Rafflecopter giveaway
Second.....TPT is having a Cyber Monday Sale!  Wahoooo!!!


The sale runs two days, starting tomorrow (November 28 and 29)!  Buyers can salve up to 28% by using code CYBER2016 at checkout!

Best of luck for the contest and happy shopping!!

If I were you, I would get those shopping carts loaded now.......


November 24, 2016

Happy Thanksgiving---and a TPT sale!

Happy Thanksgiving to all of my blogging friends!

Image result for thanksgiving comics

In honor of this festive holiday, I am having a sale at my TPT store, Mind Sparks!  Everything will be 20% off Today (November 24th) through Sunday (November 27th).

This means 20% off all of my bundles, like my most recent bundle of comprehension quick checks.


This means 20% off all of my games, like the newest Connect Four I just made.  Whoop whoop!


Happy shopping....but more importantly....HAPPY EATING!


November 20, 2016

Pastries for Parents


Community involvement is a HUGE focus in our school district, as I am sure it is in many of your districts.  If you are searching for some great ideas....I have got one for you!

Last week, the elementary school where I work hosted Pastries for Parents.  As the interventionist, I was the lucky one (thankfully I had some amazing helpers) who planned the event.  That may sound like a complaint---but seriously---I love planning events, but there is no way I could have pulled it off without my volunteers.

Anyway....the turnout was AMAZING!  We had so many parents show up that parents were circling the school to find parking spaces.  It. Was. Awesome!


Want to know the format?

Well.....our school opened its doors at 7:15am. Parents, students, brothers, sisters, aunts, uncles and grandparents filtered through the donuts, juice and coffee line and then headed to classrooms where they read or played games with their child.  

Teachers were asked to leave their classrooms unlocked and to set out books and games students and their families could use.  Many teachers set these things out the night before and instructed the students on what they could do with their parents.  All in all this event was little prep for teachers, yet they did (and they were so gracious and willing) to give up their Friday morning so parents and students could be in their room.  If opening up teachers classrooms are not an option for your school---you could have books and games set up in the gym, library or cafeteria. 

Students and their families were able to stay(if they wanted) in their classroom from 7:15 to 8:15, and then at 8:15 our principal got on the intercom and notified parents that the event was over.  All students then reported to the gym for morning announcements, and our regular school day began. 

Want to know what you need to pull off the event?

First, you need to secure volunteers.  I needed help with passing out donuts, filling juice cups and serving coffee. I believe I had about 6 people helping me serve.

Second, you need to notify teachers.  

Third, you need to pre-order all of your supplies. We ordered our 30 dozen donuts, plates, napkins, frozen juice and coffee a couple weeks in advance.  We wanted to give the bakery plenty of notice--as 30 dozen donuts PROBABLY requires extra help.   

Fourth, you want to set up your donut and drink station up the night in advance. My janitor did this for me---love her!  I also mixed the frozen juice in large jugs and set the jugs in the refrigerator.  Making the juice in advance saved me some time in the morning......


Fifth, you will have an early morning pick up of donuts. I picked mine up at 6:30am.... yikes...right?  I wanted to give myself plenty of time to set them up, and get the juice out before parents and students arrived.

Check out my early morning tweet....

Sixth...ENJOY THE EVENT!


November 14, 2016

Quick Draw (A GREAT game to review vocabulary!)

Where do the weekends go? I swear I blink and the weekend is gone.

Anyway....I wanted to share an extremely easy, no prep and engaging game you can play with your students.  I call it quick draw!


So--the title isn't the greatest---but trust me the kids will LOVE the game! 

Basically quick draw is a game to review or introduce vocabulary terms, words on a word wall or even spelling words.  

Quick draw requires virtually no prep and the materials needed are in almost every classroom.  

Doesn't this sound like a great game--huh?  No prep.  No materials. AND fun??

Anyway.....

Here's how you play:
  1. Determine the list of words you want to introduce or review
  2. Provide each student with a marker board
  3. Provide each student with a dry erase marker 
  4. Shout (okay maybe not shout...but say) the word aloud to students
  5. Give students 30 seconds to illustrate the word
  6. Say, "3.....2.....1....show me!" and every student MUST hold up their illustration (if they are still drawing I give them a warning, and tell them they get paper pencil next time)
  7. Select a couple of students to explain their drawing to the class
It really is a great game!!  I played it with my whole class when I taught fourth grade, but I also play it with my small groups for intervention time. Pictured below is Quick Draw in action......


If you want to download the "cute directions" on how to play this game....you can download it for free from my google drive, by clicking below :).


Hope you all are having or had a great day! :)

October 29, 2016

Notebook Paper--the best Halloween costume for teachers!

So in case you don't know Halloween is on Monday.....

I am sure your kids haven't been talking non-stop about it......

I am sure you aren't dreading the calm and quiet classroom party......

Well, if you are like me you plan your Halloween costume last minute (like 8pm the night before.)

So...since I usually have procrastinated, I have to come up with something easy and quick (and preferably cheap).  This year one of my teacher friends gave me the great idea of being a piece of notebook paper.   Ummmmm...yes....genius!


 I must say it was a big hit with the kids.....although some of them thought I was a flag (**cough, cough** Kindergartners **cough, cough**).  Some also thought I was homework....which is closer than a flag, ha!

Besides being a big hit.... the Notebook Paper costume was cheap ($3.99 people, and sharpies from my school!!!), quick to make (under thirty minutes) and easy!

Here is what you need:

  • Large white t-shirt
  • ruler
  • red sharpie
  • blue sharpie
  • black sharpie
  • flat surface 
  • paper towels (to put inside the shirt, so the sharpies won't bleed through)
Pictured are all the supplies you will need for making the Notebook Paper costume!

Here's how you do it: 
  • Lay shirt flat on a hard surface
  • Place paper towels inside the shirt (prevents sharpies from bleeding onto the other side)
  • Use the red sharpie, and draw a line down the left side of the shirt (shoulder tip to bottom)
  • Using the blue Sharpie make dots (spaced 2 inches apart) down the shirt on both sides. 
First draw your red line, and then add blue dots spaced 2 inches apart.
  • Next. connect the blue dots using a ruler.  Make sure you don't draw over the red line!!
Connect the blue dots with the blue sharpie creating straight lines.
  • Finally, add your name to the upper right hand corner.
  • and VOILA--you are done! 


I mean how cute is that?  How easy is that....and how cheap is that??

I paired my Notebook Paper costume with black leggings (hi...there comfort!) and tennis shoes.  You could easily wear it with jeans, or even sweats! :)


Here is to hoping you have a VERY HAPPY HALLOWEEN, and that you survive your classroom parties! :)


October 18, 2016

Show & Tell Tuesday

Long time no bloggy.......

I have been terrible at blogging this school year.  Sorry friends.....but I am back! :)

Anyway, today I am linking up with Forever in 5th Grade for her monthly Show and Tell Tuesday linky! :)  I just love this linky, because I love seeing what is going on with others!!


Well on Saturday I signed my life away for the next 2-3 years. 

Yikes.....

I registered and have begun the process to become a National Board Certified Teacher!  

I have heard the process is long, grueling, tedious, tiring.......BUT also rewarding and the best PD you will ever receive. 

Challenge---accepted!

I do hope you will all bear with me throughout this process, and if you are interested in becoming a candidate yourself, check out this website:  National Board for Professional Teaching Standards. 


Rudy, my lovable pooch and our school's therapy doggy, started back to work last week!  The kids sure were excited to see her!!  Here she is ready for her first day!


Saturday's in the fall are pretty much consumed by KSU football!

I sure do love me some tailgating, watching the Cats win and spending time with family!


September 11, 2016

No-Sew Curtains!

Every year when I fist step foot into my classroom.....I have the same recurring thought, "How am I going to hide all my junk this year?"

You see (like many of us) in my 9 years of teaching I have accumulated piles of stuff, boxes of things and loads of junk.

Do I throw this stuff away?  

Well.... OF COURSE NOT....I mean, "you never know when I am going to need it again!" 

Which brings me to the question I always ask myself.....how can I keep it, but not see it?!?!?

So, this year I made some inexpensive no-sew curtains!!!  They are super cute, and super great at hiding your precious treasures. (wink, wink)

The no-sew curtains took me a couple hours and cost me around $40-50 bucks.  Not too bad! :)

Here is the before, and a glimpse at why I needed to do something!


And here is the after! Goodbye junk and see ya later ugly desk cords.

Much better, right?


Are you interested in making these cuties yourself?  Just follow the steps below!


Step 1: Measure the area you want to cover up.

  • I always add a few inches in length and width.  It is much easier to cut off extra, than to start from scratch because it was too short.


Step 2: Purchase your fabric and ribbon.

  • Prior to purchasing fabric I did a quick inventory of what I had at home and then created a color scheme based around existing items.  At home, I already had some black fabric scraps and yellow....so I made my theme yellow, purple and black. Then I went to JoAnn's Fabrics (teachers can get a 10% discount there without a coupon) and hit up their clearance fabric section.  I purchased about 10 yards and only spent about 30 bucks.  I looked for fabric that had all different patterns and textures---as long as it was in my color scheme
Step 3: Set up work station

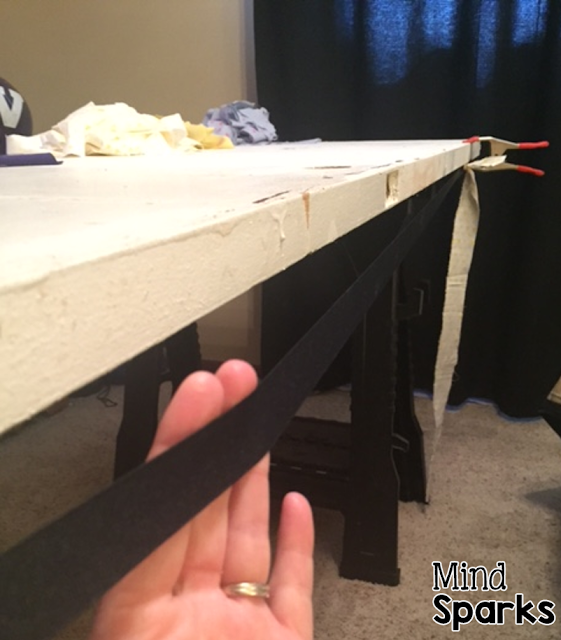
  • You will want to set up some sort of work station that allows you to full stretch out the ribbon, as you will be tying the fabric onto the ribbon.  My husband used two saw horses and an old door.  We then clamped down the ribbon on each end of the door, with a little slack so I would be able to pull out the ribbon and tie.  You could also tie the ribbon to two chairs, a bar stool or hooks.....just as long as it is fully extended.
Two saw horses, an old door and clamps helped me secure my ribbon.

This is about how much slack you want in the ribbon, so you can easily tie fabric.

Step 4: Cut ribbon

  • Cut the ribbon a couple of inches longer than the desired area you are covering.  It is always easier to cut off extra than to start from scratch because you don't have enough width.
Step 5: Cut fabric into strips
  • Just like with the ribbon, you will want to cut your fabric longer than the desired length.  Not only do you not want it to be too short, but you also need to account for the fact some of the length will be used for the knot you are tying.  I would say an extra 5-6 inches, and you will be good to go!
Step 6: Organize fabric into piles
  • I wanted my no-sew curtains to be in a pattern, so I laid my fabric into sorted piles.  You could skip this step if you don't want to follow a pattern.....just stick the fabric strips into a big pile. :)


Step 7: Tie your fabric strips to the ribbon
  • Make a loop with the top 5-6 inches of fabric

  • Place the fabric loop behind the ribbon

  • Hold the fabric loop with one hand (ribbon is on top of fabric loop)
  • bring the remaining hanging fabric over the ribbon and through the loop

  • Select another piece of fabric and keep tying until ribbon is full!


Step 8: Remove the no-sew curtains from work surface
  • Once I was finished, I un-clamped my work and hung the no-sew curtains over a hanger.  I didn't want them getting tangled as I transported them to school. 
Step 9: Hang Curtains
  • There are many ways to hang these curtains.  You can Velcro, double sided tape, hot glue or even use 3M hooks.  I personally used Velcro....and lots of it....these babies are pretty heavy with all of that fabric.  I placed one sticky side of the Velcro to my desk/table, and then they other side of the Velcro on one of the pieces of fabric....and voila! 

All in all...I am pretty thrilled with how this project turned out!  It was cheap, took a couple hours and made my classroom instantly cute and homey!  If you have any questions--feel free to contact me!

Happy Crafting! :)